Where I Aut-a Be

Teaching tips, ideas, and resources for Special Education

  • Home
  • About
  • Blog
  • Shop
  • Contact

Holiday Craft For Kids

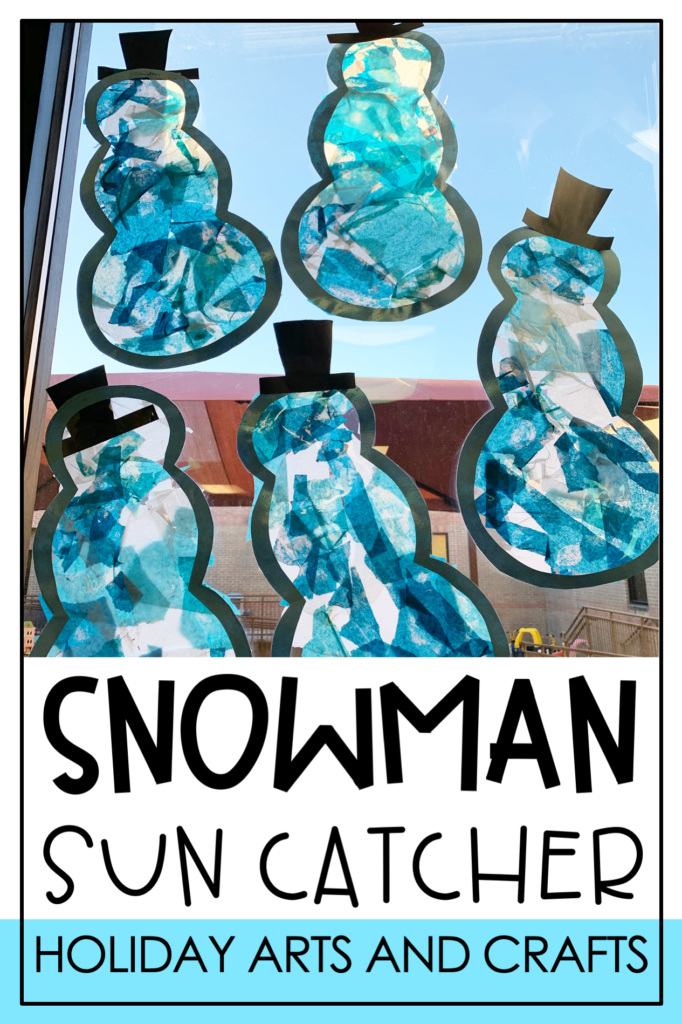
Need a fun holiday craft for kids to do before winter break? Here is one of my favorite and simple holiday crafts! Below I have compiled a step by step guide for you to create a sun catcher snowman with your students. Below I have listed the supplies you will need:

snowman sun catcher display

–construction paper

–laminator (or contact paper). This is not the exact one I used since my snowmen shapes were larger, however this will work if plan to use smaller shapes!

–lamination pouches

–tissue paper

–glue-stick

–scissors

–tape

Trace your snowman craft shape on construction paper first

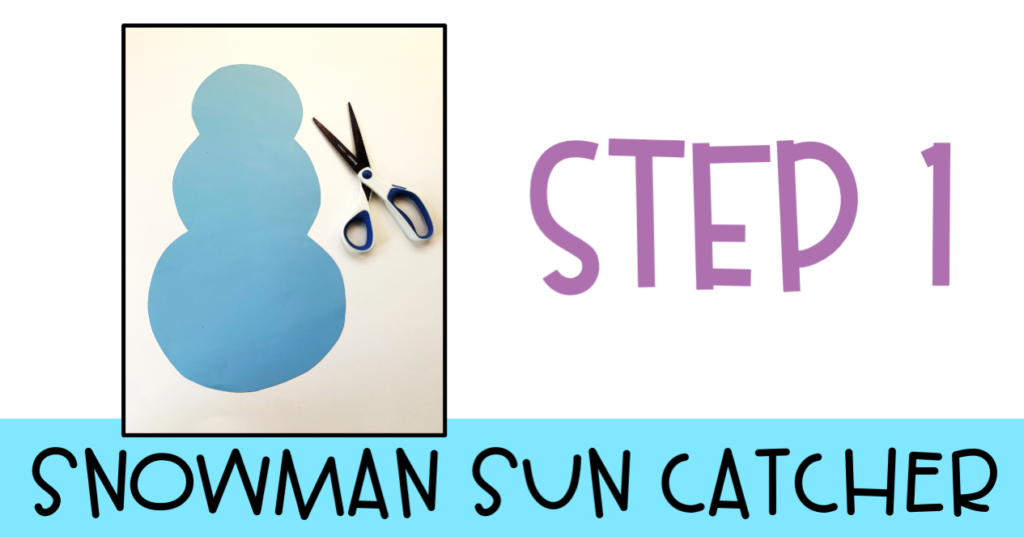
Step 1- Draw Your Shape

You really can do any shape that you want here. I like using snowmen, because they are not specific to Christmas per say. I try not to center all activities around Christmas and keep things pretty neutral. Here are some other ideas for neutral sun catchers: coffee mug, ice skate, penguin, polar bear, mitten, candy cane, etc. Something to keep in mind before you draw your shape is what size laminator you have. I used my school’s laminator which is about 20 inches wide so I was able to draw a larger shape. If you only have a 11 or 13 inch laminator, just make sure your shape fits inside your lamination pouch.

cut out the inside of the snowman shape

Step 2- Cut Out Your Shape

You’re going to need to cut the inside of your shape. I simply use scissors and start in the center of the shape. I make a small hole in the center of the shape with my scissors and then I can cut outward from the hole. You’re going to want to cut out enough of the shape to only leave about one inch of a trim. The rest should be hollow!

laminate your snowman shape

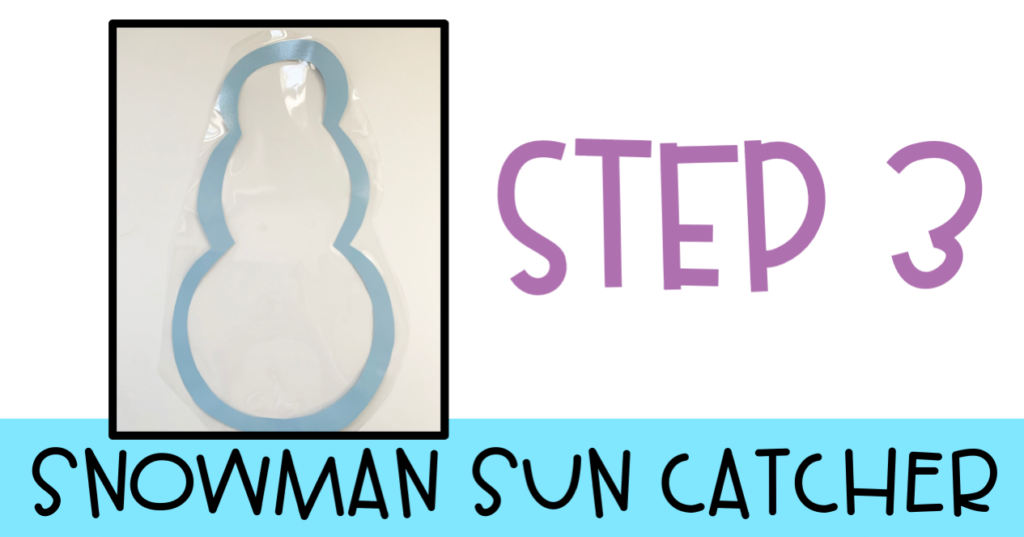
Step 3- Laminate Your Shape

Next up you are going to laminate your shapes. Run your shapes through the laminator and then cut only what is on the outside of the shape. Therefore don’t cut the inside of the shape! I have also heard that you can use contact paper for this step in the case that you don’t have a laminator and lamination pouches.

rip a variety of tissue paper to fill your snowman craft!

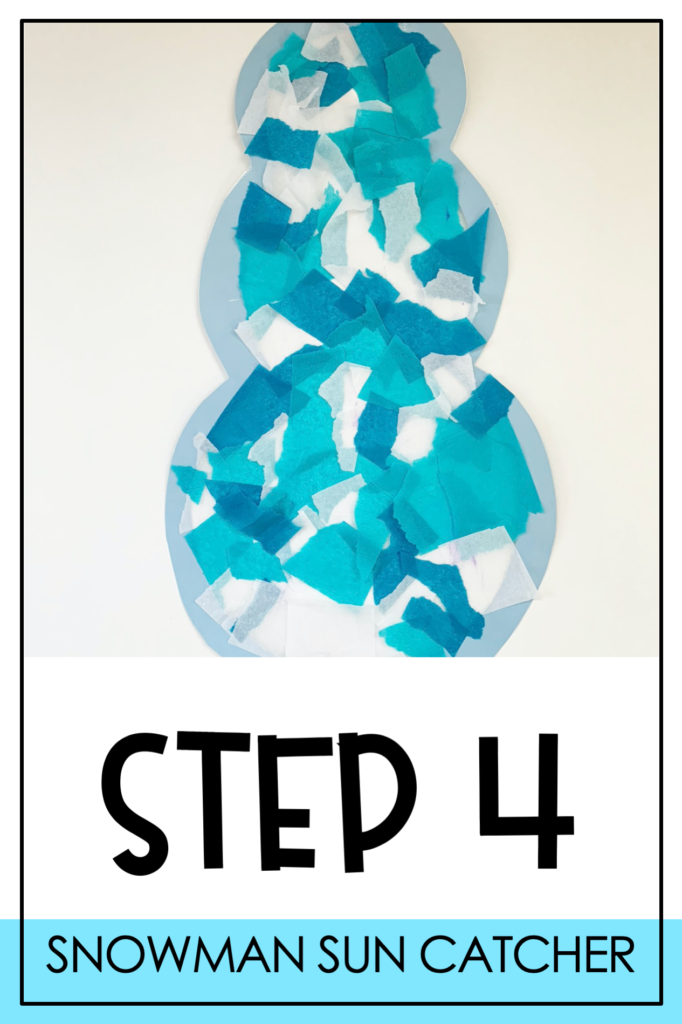
Step 4- Rip Tissue Paper

Now your shape is ready for tissue paper. Have your students choose their colors and tear small pieces of tissue paper for some fine motor incorporation! I am not picky here with how my students tear the paper. Remember, this is their creation! Let their art be their art.

time to glue the paper onto the laminate to fill your snowman!

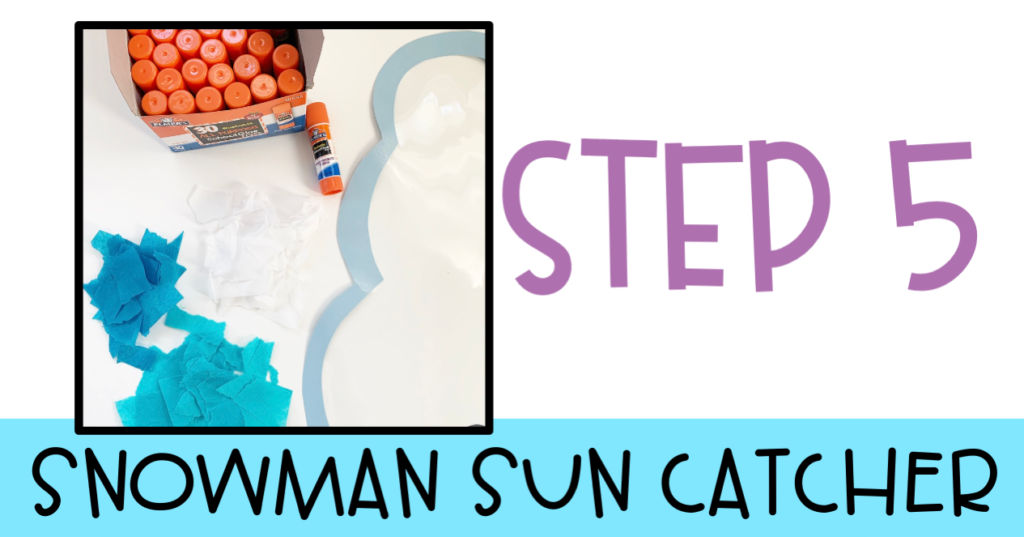
Step 5- Glue Tissue Paper

Glue the tissue paper to only one side of your shape. I like to use Elmer’s glue sticks. They are such good quality for an activity like this! Once the glue dries, you can have your students cut any shaggy edges around the snowman if needed and then your art is finished!

Step 6- Display Your Holiday Craft

Pick any window and use some tape to display your snowman! I like to tape the side with all the tissue paper facing the window so that the glossy side of the lamination is facing you!

I hope this was helpful to you! Most importantly, hope that this activity is a fun memory you can create with your students or kids before winter break!

Happy Teaching! Be sure to check out my other posts here!

Filed Under: Uncategorized

« 4 Things I Wish I Did As A First Year Teacher
We’re Pregnant! + First Trimester Pregnancy Recap »

Subscribe via Email

Search

Categories

Latest on Instagram

Toy rotations are a great way to increase toddler Toy rotations are a great way to increase toddler independence during play time!

Here are a few guidelines I try to follow when rotating toys. These are all things I learned in my classroom and teacher days!

⭐️present the toys “undone”. For example, take the pieces off the puzzle to help encourage completing tasks from beginning to end

⭐️encourage a variety of toys. Toys the encourage imaginative play, toys that encourage building/stacking, toys that encourage fine motor practice, toys that encourage problem solving, etc. 

⭐️Be sure that the toys are clearly visible. I used to use tall baskets to display toys within the shelves, but baskets = hidden toys🙅🏻‍♀️ open and easily accessible if possible!

Comment below if you’d like any links!❤️
✨3 MONTHS✨ What I loved the most about month ✨3 MONTHS✨ 

What I loved the most about month 3 are all the memories we made as a family🥰 We got to take the girls to the beach and it was so special! Lily showed us so many smiles and giggles this month too🥹 Month 4 here we come❤️❤️❤️
Lily’s first dip in the ocean🥲 love this litt Lily’s first dip in the ocean🥲 love this little family of mine!
Halloween Toddler Finds! Let me know if you wanna Halloween Toddler Finds! Let me know if you wanna see part 2 🎃🎃🎃
September Sensory Bin Details👇🏼 Trying out September Sensory Bin Details👇🏼

Trying out a new sensory bin filler this month-oats!

What’s in this sensory bin:
Oats
Mini pie tins 
Funnel
Scooper
Apples

What’s on the activity bin side:
Apple trees (made of water containers for painting and paper)
Pouch lids
Scooper tool

Let me know if you’d like to know where anything is from!👇🏼
It’s the final day of 10 days of learning tower It’s the final day of 10 days of learning tower toddler activities and it’s also September 1st so we’re making an apple garland for our September bookshelf!

All you need is apple shapes and literally whatever are supplies you have

Just tape your paper down and put out some art supplies! This was something that took us a whole day and came back to 3-4 times to complete.

Once you’re finished cut out the apples, add a little whole punch, and string them all together. Tape to your bookshelf and you’re done!

I still need to change out my September books but I loved the way this turned out!
It’s day 9 of 10 days of learning tower toddler It’s day 9 of 10 days of learning tower toddler activities and we’re doing a little dot sticker rainbow

All you need is paper, markers, and dot stickers

Just tape your paper down, draw a large rainbow, and hand your toddler some dot stickers. I like to just give her one color at a time so it’s less overwhelming

My toddler loved this activity! Can’t wait to do it with more shapes!

Stay tuned for day 10
It’s day 8 of 10 days of learning tower toddler It’s day 8 of 10 days of learning tower toddler activities and we’re gonna set up a little threading station

All you need is a cut up pool noodle and jumbo pipe cleaners (got these at Target)

You could also easily do this with cheerios and regular pipe cleaners too 

I love these thick pipe cleaners for this activity because the pipe cleaners don’t fall off easily.

Stay tuned for day 9
It’s day 7 of 10 days of learning tower toddler It’s day 7 of 10 days of learning tower toddler activities and we’re doing some toddler science!

Okay this is nostalgic because we did vinegar play all the time in my classroom and now I get to do it with my toddler.

All you need is a large tray or container, muffin tin, baking soda, vinegar, food dye or liquid water color, and some sort of squirt bottle or dropper tool

This activity gets messy so you’ll want to make sure to put the muffin tin inside a larger container to contain all the mess.

First fill all the muffin tin about 3/4 full with baking soda

Then add some liquid water color and mix up the mixture

Fill up your squirt bottle with vinegar and have them pour it over the muffin tin

If your toddler has a tendency to dump things (normal curious behavior!), this may be a better outdoor activity!

Stay tuned for day 8

Latest on Pinterest

  • Science can be a tricky subject to teach in the special education classroom. Often special education teachers aren’t given a science curriculum, which means creating your own. But if you are tired of searching for the perfect science units for your special education classroom, I’ve got you! Here you will find a simple, easy to use science unit designed to help teach your students about Food Chains. This unit includes differentiated worksheets, an adapted book and errorless learning activities.
  • Let’s talk about teacher work boundaries. It can be so easy as a teacher to set up and hold to teacher work boundaries but it is so important. Establishing boundaries for yourself as a teacher helps you create a better work life balance and helps prevent burnout as a special education teacher. If you need help setting teacher boundaries this year, here are 5 boundaries I set as a special education teacher and how it helped me be a happier, more productive teacher.
  • As a special education teacher, it’s rate to be given a social studies curriculum for your special education classroom. So how do you teach social studies when you aren’t given social studies resources to use with your students? Here are so my favorite tips and tricks for creating hands-on, engaging social studies activities your students will love along with my favorite social studies resources for special education students. Learn more here.
  • Science can be a tricky subject to teach in the special education classroom. Often special education teachers aren’t given a science curriculum, which means creating your own. But if you are tired of searching for the perfect science units for your special education classroom, I’ve got you! Here you will find a simple, easy to use science unit designed to help teach your students about Food Chains. This unit includes differentiated worksheets, an adapted book and errorless learning activities.
  • Science can be a tricky subject to teach in the special education classroom. Often special education teachers aren’t given a science curriculum, which means creating your own. But if you are tired of searching for the perfect science units for your special education classroom, I’ve got you! Here you will find a simple, easy to use science unit designed to help teach your students about Food Chains. This unit includes differentiated worksheets, an adapted book and errorless learning activities.
  • Special education teachers, these hacks will be a game changer in your classroom! If you are struggling with classroom organization, data collection, or prepping your classroom materials, these tips and trick are for you. They are by far my favorite special education teacher tricks to not only help you stay organized by all keep up with all the day to day aspects of being a special education teacher. Don’t sleep on these special education teacher hacks.
  • Science can be a tricky subject to teach in the special education classroom. Often special education teachers aren’t given a science curriculum, which means creating your own. But if you are tired of searching for the perfect science units for your special education classroom, I’ve got you! Here you will find a simple, easy to use science unit designed to help teach your students about Food Chains. This unit includes differentiated worksheets, an adapted book and errorless learning activities.
  • Paraprofessionals are an essential part of the special education classroom. Whether it’s supporting students, deescalating behaviors, tracking data, or assisting with centers, paras are some of the most important people in the classroom. But what happens when conflicts arise with paras and support staff in your classroom? How do you resolve conflicts in your special education classroom? Here is my favorite conflict resolving exercise that can help everyone work together cohesively.
  • Do you have any classroom supplies that you just can’t get enough of? Things that use in your special education classroom and buy year after year? Here are my favorite Amazon classroom supplies as a special education that I can’t get enough of. These supplies are perfect for setting up your special education classroom, prepping resources, helping with classroom organization, behavior management and addressing sensory needs. Find my favorite Amazon teacher supplies here.

Latest on Facebook

Copyright © 2025 · Becca Paro Design Co., LLC